Wednesday, November 25, 2009
Banana Nut Bread
A blogger friend of mine whose job involves writing about food told me about the C & H Sugar website. I use C & H sugar all the time but had never checked out their site before. It contains all sorts of great recipes for yummy-sounding treats. I decided to try their recipe for banana bread, which uses brown sugar. I make banana bread all the time but have never seen a recipe using brown sugar. It was great--the brown sugar added a deeper flavor and I will definitely make this one again. I omitted the nuts, and, to my kids' dismay, decided not to add chocolate chips! The nice folks at C & H are sending me a $20 gift card to help out with the expenses. Thank you so much, C & H--I'll definitely be back to your lovely site!
BANANA NUT BREAD
2 cup all-purpose flour
1 1/2 tsp baking powder
1/2 tsp baking soda
1/4 tsp salt
1/2 tsp cinnamon
1/4 tsp nutmeg
2 eggs, lightly beaten
1 1/2 cup banana, mashed ripe (about 4 medium)
1 cup C & H Pure Cane Golden Brown or Dark Brown Sugar (I used Golden Brown)
1/2 cup butter, melted or vegetable oil
3/4 cup walnuts or pecan, coarsely chopped (I omitted)
Preheat oven to 350ºF. Grease 9x5x3-inch loaf pan. In large bowl, combine flour, baking powder, baking soda, cinnamon, nutmeg, and salt. Make a well in center and set aside. In another large bowl, combine eggs, bananas, sugar, and melted butter or oil. Add egg mixture all at once to flour mixture. Stir until just moistened; batter will be lumpy. Fold in nuts. Spoon batter into pan. Bake 50 to 60 minutes or until toothpick inserted in center comes out clean. Cool in pan on wire rack for 10 minutes. Remove loaf from pan and cool completely on rack.
Wednesday, October 14, 2009
Barefoot Bloggers: Cheddar Corn Chowder and How I Stalked Ina On My Summer Vacation
Don't pay the ransom!!!! I've escaped!!! Not really--I HAVE been MIA for QUITE a while but am back. I spent the summer all over the place.....including the Hamptons, where I not only met and had dinner with Ina's decorator--and may I just say....he is FABULOUS.....but I also spent several days stalking Ina herself. No, I never found her, but I did go to many of her favorite Hamptons' spots! How bad can that be?? I spent several wonderful days at my very good friend's house in Southampton....or, actually, in South, as the lingo goes. Yes, that's right, we Hamptoners--Hamptonites--Hamptonians--well, we just say South for Southampton, East for East Hampton, Bridge for Bridgehampton, and so on. So my friend, we'll just call her "S," and she is also FABULOUS, or maybe I should say FABULOUSER, led a few of us on a several-day Ina-stalking tour. Armed with Barefoot at Home, where Ina details her favorite places in the Hamptons, we aimed to go to as many of them as possible. The first night I was there we had dinner at Robert's house. He is Ina's amazing decorator and he is a wonderful host. He is my friend S's decorator and friend. And now he is my friend. My new best friend, in fact. Yes, we are besties.... BFF's.....best buds. He served great food, told great stories, and introduced me to "Hamptons' pool water" which to all you non-Hamptonians out there--is a very delicious and very pricey Rosé wine. The "All Ina All the Time Tour" started the next day. S took us to Loaves and Fishes and also to Cavaniola's Gourmet Cheese Shop for amazing cheese and even more amazing panini sandwiches--S's daughter claims they are life-changing and after eating one I had to agree with her. We went to Tate's Bake Shop for their famous chocolate chip cookies.
Every place was great--and I wouldn't expect anything less from Ina--but my favorite place, hands-down, was Round Swamp Farm, (see photo above) a shop located in a tiny little house which sells fabulous produce, baked goods, and prepared foods as well as seafood.
Cinnamon rolls to die for. I am still dreaming about them. We also went to H. Groome, Bloom, the Monogram Shop, and Turpan, which are some of Ina's faves for cookware and tableware. And yes, I tried to buy a little something everywhere--after all, if it's good enough for Ina, it's good enough for me. The stalking culminated in a visit to Ina's house. Well, maybe not a visit--maybe a viewing is more accurate. Yes, I saw the house, the barn, the garden.....I saw whatever I could see peering over her front gate. Here's a sneaky little shot of the barn. Yes, THE barn. Here it is:
Thank you, S (and family), for being a fantastic tour guide and host--I think even Ina could learn a few things from you! The food, the beach, the fun, the shopping, the talking, the walking, the stalking....it was all great! Can't wait til next summer......:))
I also spent some time in Paris and our hotel was right around the corner from Ina's apartment. I don't know which one was hers, but I stumbled upon her favorite street market (the Boulevard Raspail Street Market) which, as she says in Barefoot in Paris, is right in front of her apartment. So, it was an exciting summer.....now back to blogging.
The latest "Barefoot Bloggers" recipe is from Ina's Barefoot Contessa cookbook and is another keeper! Thanks to Jill of My Next Life for selecting this easy and delicious recipe! I halved the recipe and it still made a lot. It was really good!
CHEDDAR CORN CHOWDER
from The Barefoot Contessa Cookbook
8 oz bacon, chopped (optional)
1/4 C good olive oil
6 C chopped yellow onions (4 large onions)
4 T (1/2 stick) unsalted butter
1/2 C flour
2 t kosher salt
1 t freshly ground black pepper
1/2 t ground turmeric
12 C chicken stock
6 C medium-diced white boiling potatoes, unpeeled (2 pounds)
10 C corn kernels, fresh (10 ears) or frozen (2 pounds)
2 C half-and-half
8 oz sharp white cheddar cheese, grated
In a large stockpot over medium-high heat, cook the bacon and olive oil until the bacon is crisp, about 5 minutes. Remove the bacon with a slotted spoon and reserve. Reduce the heat to medium, add the onions and butter to the fat, and cook for 10 minutes, until the onions are translucent.
Stir in the flour, salt, pepper, and turmeric and cook for 3 minutes. Add the chicken stock and potatoes, bring to a boil, and simmer uncovered for 15 minutes, until the potatoes are tender. If using fresh corn, cut the kernels off the cob and blanch them for 3 minutes in boiling salted water. Drain. (If using frozen corn you can skip this step.) Add the corn to the soup, then add the half-and-half and cheddar. Cook for 5 more minutes, until the cheese is melted. Season, to taste, with salt and pepper. Serve hot with a garnish of bacon.
NOTES: I halved the recipe and used 1 1/2 half bags of frozen corn. I mixed yellow and white corn and it looked really nice. I think you could easily omit the bacon. Chives or green onions would make a nice garnish.
Sunday, June 14, 2009
Barefoot Bloggers: Curried Couscous
The latest "Barefoot Bloggers" recipe is from Ina's Barefoot Contessa cookbook and is another keeper! Thanks to Ellyn of Recipe Collector and Tester for selecting this easy and delicious recipe! It can easily be adapted to use anything you have in your refrigerator or pantry. (You could even substitute many different grains for the couscous!) I forgot to get both scallions and red onions at the store so I used the sweet onion I already had at home. I made the dressing as directed, using less salt, of course, and then made a little extra after I mixed it with the couscous. I think it needed it. This would be a great side dish for a summer picnic, BBQ, or just dinner at home.
CURRIED COUSCOUS
from The Barefoot Contessa Cookbook
Serves 6
1 1/2 C couscous (I used half whole wheat couscous and half regular)
1 T unsalted butter
1 1/2 C boiling water
1/4 C plain yogurt
1/4 C good olive oil
1 t white wine vinegar
1 t curry powder
1/4 t ground turmeric
1 1/2 t kosher salt
1 t freshly ground black pepper
1/2 C small-diced carrots
1/2 C minced fresh flat-leaf parsley
1/2 C dried currants or raisins
1/4 C blanched, sliced almonds
2 scallions, thinly sliced (white and green parts)
1/4 C small-diced red onion
DIRECTIONS
Place the couscous in a medium bowl. Melt the butter in the boiling water and pour over the couscous. Cover tightly and allow the couscous to soak for 5 minutes. Fluff with a fork.
Whisk together the yogurt, olive oil, vinegar, curry powder, turmeric, salt, and pepper. Pour over the fluffed couscous, and mix well with a fork. Add the carrots, parsley, currants, almonds, scallions, and red onions, mix well, and season to taste. Serve at room temperature.
Thursday, June 4, 2009
Barefoot Bloggers: Outrageous Brownies
Ina, Ina, Ina--we've had such a good run so far. Until now. Call me crazy--but I just don't feel the brownie love that everyone else feels for this recipe. In fact, I found it to be kind of......meh. I know, I know, it's subversive to even THINK like that, much less put it in writing. Maybe it was the coffee, maybe I overbaked them--although they cooked for exactly 30 minutes, I don't know what the problem was, but all I know is I have two chocolate-loving boys at home--and a week after I made this "Barefoot Bloggers" recipe from Ina's Barefoot Contessa cookbook, I STILL had brownies left over. Yes, you heard that right. I rest my case. That NEVER happens with my old stand-by--my secret, never-fail, to-die-for brownie recipe. OK, OK, it's the Ghirardelli brownie mix (pack of five) that I buy at Costco. But if you tell anyone, I'll deny it. Get it??? Good. Glad we understand each other. This conversation NEVER happened.
OUTRAGEOUS BROWNIES
from The Barefoot Contessa Cookbook
INGREDIENTS
1 pound unsalted butter
1 pound plus 12 ounces semi-sweet chocolate chips, divided
6 ounces unsweetened chocolate
6 extra-large eggs
3 T instant coffee powder
2 T real vanilla extract
2 1/4 C sugar
1 1/4 C all-purpose flour, divided (1 C for batter and 1/4 C in the chips and nuts)
1 T baking powder
1 t kosher salt
3 C diced walnut pieces (I omitted)
DIRECTIONS
Preheat oven to 350ºF. Grease and flour a 13 by 18 by 1 1/2-inch sheet pan.
Melt together the butter, 1 pound chocolate chips, and unsweetened chocolate on top of a double boiler. Cool slightly. Stir together the eggs, instant coffee, vanilla and sugar. Stir in the warm chocolate mixture and cool to room temperature.
Stir together 1 C of the flour, baking powder and salt. Add to cooled chocolate mixture. Toss the walnuts and 12 ounces of chocolate chips with 1/4 C flour to coat. Then add to the chocolate batter. Pour into prepared pan.
Bake for about 30 minutes, or until tester just comes out clean. Halfway through the baking, rap the pan against the oven shelf to allow air to escape from between the pan and the brownie dough. Do not over-bake!! Cool thoroughly, refrigerate well and cut into squares.
Thursday, May 14, 2009
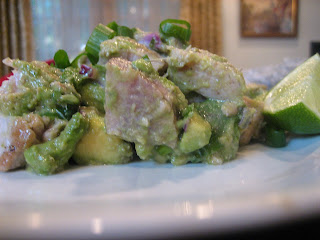
Barefoot Bloggers: Tuna Salad or This is Not Your Mother's Tuna Salad!
Put the mayo and the pickle relish away--this is a whole new kind of tuna salad. Ina Garten's Tuna Salad is made with fresh tuna and has sort of an Asian vibe going on. It's light, fresh, and delicious--a great summer lunch or dinner for people you really like--because fresh tuna steak is not cheap!! I walked out of the first store I went to when I saw that fresh tuna was $30.99 a pound. If I paid that much for the tuna I would have to put it in my safe deposit box!! I ended up getting it at Whole Foods for $20.99 a pound. As always, I didn't use as much salt as our girl Ina calls for. I sprinkled kosher salt on the tuna steaks before cooking and then added a little additional salt to the mixture after tasting. I would definitely make this one again! Probably a good dish to make when you see tuna on sale at your grocery store.
INGREDIENTS
2 pounds very fresh tuna steak, cut 1-inch thick
4 tablespoons olive oil, plus extra for brushing
2 1/2 teaspoons kosher salt, plus extra for sprinkling (NOTE: taste dressing before adding salt)
1/2 teaspoon coarsely ground black, plus extra for sprinkling
2 limes, zest grated
1 teaspoon wasabi powder (available in the Asian food section of most grocery stores)
6 tablespoons freshly squeezed lime juice (3 limes)
2 teaspoons soy sauce
10 dashes hot sauce (recommended: Tabasco) (NOTE: I used all 10 dashes)
1 to 2 ripe Hass avocados, medium diced
1/4 cup minced scallions, white and green parts (2 scallions)
1/4 cup red onion, small diced
DIRECTIONS
Brush the tuna steaks with olive oil, and sprinkle with salt and pepper. Place the tuna steaks in a very hot saute pan and cook for only 1 minute on each side. Set aside on a platter.
Meanwhile, in a small bowl, combine the olive oil, salt, pepper, lime zest, wasabi, lime juice, soy sauce and hot sauce. Add the avocados to the vinaigrette.
Cut the tuna in chunks and place it in a large bowl. Add the scallions and red onion and mix well. Pour the vinaigrette mixture over the tuna and carefully mix.
Saturday, May 2, 2009
Cathy's Famous Vietnamese Spring Rolls
My fabulous manicurist (and so much more!) Cathy surprised me the other day when I went to get my nails spruced up. She told me she had bought me all the ingredients I needed to make her Vietnamese spring rolls. Not only had she bought me the ingredients, she also wrote up the recipe, took these photos, and made up a batch of the dipping sauce!! She bought me an extra bottle of hoisin sauce, a bottle of Sriracha hot sauce, mint, cucumbers, bean sprouts, rice paper, and some nameless Asian greens to try, too. You'd think at that point that she could have offered to come over to my house and just make them, but I don't want to seem TOO demanding. Oh, and she also did a fantastic job as usual on my nails. She's amazing! Cathy even rolled up a sample roll for me right there at the salon so I could see how much of each ingredient was used. She did everything but type up this post!
CATHY'S FAMOUS VIETNAMESE SPRING ROLLS
SPRING ROLL SAUCE
2 cups of water
1 1/2 cups of Hoisin Sauce
1/2 cup of peanut butter (smooth or chunky)
2-3 tablespoons of white vinegar
Sriracha hot sauce to add on when eating (optional)
SAUCE:
In a small saucepan add water, Hoisin sauce and peanut butter all at once. Over low heat, stir with a spoon until the peanut butter is nicely blended, then add the white vinegar. Turn off heat and set aside.
SPRING ROLL
1/2 pound of boneless chicken thigh or 1/2 pound of Sirloin pork end
1/2 pound of bean sprouts (open the bag and drain and rinse well)
1 cucumber (cut both ends off of cucumber, clean & cut in half and then into 1/4" thin slices-- about 3" length)
1 bunch of green leaf lettuce
1 bunch of fresh mint leaves
1 package of Rice papers
(Other ideas include--noodles--Asian rice noodles, cilantro, carrots, and as mentioned below, shrimp)
DIRECTIONS
NOTE: Cathy usually uses pork, but for those who don't like pork chicken works well too. I think shrimp would be good as well.
For pork: In a slow cooker add water and 1/4 teaspoon of Kosher salt, 3 gloves of garlic and maybe 8-10 peppercorns. Slow cook for 20-30 minutes. When meat gets tender, remove from slow cooker and rinse with cold water, then set aside for 5-10 minutes to keep the moisture inside meat. Then slice thinly and set on a plate. You can also bake this in an oven til done.
For chicken: Marinate chicken with 1/4 teaspoon of Kosher salt, bit of fresh ground pepper and 1/4 teaspoon of garlic powder for about 15-30 minutes. You can grill your chicken or pan-fry your chicken. Cathy says "I like to pan-fry the chicken because this dish has a very clean taste so I don't mind pan-frying the chicken to keep the moisture and juice from the meat-- also when you pan-fry you can add on some fresh chopped garlic." Make sure the chicken is cooked well but not over-cooked, wait about 5-10 minutes after cooking for the meat to cool down, then slice 1/2" thick and set aside.
ROLLING SPRING ROLLS
In a big mixing bowl add warm water from the faucet to dip rice paper. Dip rice paper in water and then set on a big plate. On rice paper about 2" away from the edge of the rice paper--put 1/2 of a lettuce leaf or a little less, a few bean sprouts, a cucumber slice, 2 pieces of thin-sliced pork (or chicken or shrimp) and 2-3 leaves of fresh mint, (place all ingredients on top of each other and about 2" away from the edge of rice paper).
Now fold both sides of rice paper toward the center and try to cover the food, then start to roll as tightly as possible. Try not to have the rice paper dry out, it will stick to the plate. To help your work go faster use 2 plates for the rice paper while working on one and the other one has time to get soft and dry. Do not put your Spring Rolls on top or too close to each other, because rolls will be sticky and break when pull apart. Cathy usually uses clear plastic wrap to keep the rolls from drying out and sticking to each other.
Serve with dipping sauce and hot sauce on the side.
Cathy says "Have Fun Making Your Spring Rolls......!"
UPDATE: We made these spring rolls tonight using bean sprouts, lettuce, mint, cellophane noodles, cucumber, and shrimp. They were great! I mixed a LITTLE bit of the Sriracha sauce into the dipping sauce and it really cleaned out my sinuses--that stuff is HOT! Thank you Cathy!
Thursday, April 23, 2009
Barefoot Bloggers: Croque Monsieur
You don't need your passport to get a taste of France--Ina Garten's come up with another winner and it's the classic French ham and cheese sandwich known as Croque Monsieur. A simple sandwich that the French have transformed into heaven on a plate, the Croque Monsieur is surprisingly easy to make. This "Barefoot Bloggers" recipe from Ina's Barefoot in Paris cookbook took me no more than half an hour start to finish. Thanks to Kathy of All Food Considered for a great choice! This would be great with a simple salad for lunch or dinner--and it would be a big hit as lunch for your girlfriends. Bon appetit!
CROQUE MONSIEUR
from Barefoot in Paris
INGREDIENTS
2 T unsalted butter
3 T all-purpose flour
2 C hot milk (I used skim)
1 t kosher salt (I used less, knowing Ina's a bit of a salt freak)
1/2 t freshly ground black pepper
Pinch of nutmeg
12 ounces Gruyere, grated (5 cups)
1/2 C freshly grated Parmesan
16 slices white sandwich bread, crusts removed (Ina prefers Pepperidge Farm white bread--I used supermarket brand no-
name white bread and it was fine)
Dijon mustard
8 ounces--or more (at least 8 slices) baked Virginia ham, sliced but not paper thin (I think I used French ham from the deli
DIRECTIONS
Preheat the oven to 400ºF.
Melt the butter over low heat in a small saucepan and add the flour all at once, stirring with a wooden spoon for 2 minutes. Slowly pour the hot milk into the butter-flour mixture and cook, whisking constantly, until the sauce is thickened. Off the heat add the salt, pepper, nutmeg, 1/2 cup grated Gruyere, and the Parmesan and set aside.
To toast the bread, place the slices on 2 baking sheets and bake for 5 minutes. Turn each slice and bake for another 2 minutes, until toasted.
Lightly brush half the toasted breads with mustard, add a slice of ham to each, and sprinkle with half the remaining Gruyere. Top with another piece of toasted bread. Slather the tops with the cheese sauce, sprinkle with the remaining Gruyere, and bake the sandwiches for 5 minutes. Turn on the broiler and broil for 3 to 5 minutes, or until the topping is bubbly and lightly browned. Serve hot.
Labels:
Barefoot Blogging,
French,
ladies' luncheon,
lunch,
sandwich
Thursday, April 16, 2009
Let's Take a Trip Back to the '80's (Minus the Shoulder Pads) or Sonya and Maureen's Appetizer Vegetable Pizza
When I was young, single, and employed--- back in the 80's, I worked for a big company in a department with several fabulous women. We all got along and socialized both in and out of work. Occasionally we organized what we called a "Food Fest" at the office--essentially, a potluck lunch where everyone on the floor brought a dish to share. My friends Sonya and Maureen once brought this yummy cold vegetable pizza which was a big hit. I brought this to many, many get-togethers during the 80's and I think it's time for an encore. After all, everything old is new again, isn't it?
VEGETABLE PIZZA
2 pkgs. Pillsbury crescent rolls
1 regular size packet Hidden Valley Ranch dressing mix
2 8-oz. pkgs cream cheese, softened (I use light cream cheese)
slightly less than 1 C mayo (I use light)
chopped broccoli (I used about 2 cups, finely chopped)
chopped cauliflower (I used about 2 cups, finely chopped)
chopped scallions (about 3-5 scallions, green part only)
chopped tomatoes (about 2, seeded and chopped)
chopped black olives (one can large olives, minus a few that fell into my mouth)
grated Cheddar cheese (about 2 to 2 1/2 C--can also use a mixture of cheeses--Cheddar, Colby, Monterey Jack, mozzerella)
Preheat oven to 350º. Lay the crescent roll dough flat on a cookie sheet or jelly roll pan, pinch together any gaps, poke a few holes in dough with a fork, and bake til just golden--about 10 to 14 minutes. Let crust cool. After it cools, mix the Ranch dressing with the cream cheese and mayo. Spread mixture on the crescent rolls and top with all toppings, ending with cheese. Cut into squares and enjoy.
NOTE: You can add or substitute any toppings you like--these are just the ones I use. Or should I say--the ones Sonya and Maureen used!
Labels:
appetizer,
crowd pleasers,
parties,
potluck,
vegetables
Wednesday, April 15, 2009
Dark-Haired Julie's Mother's Cookies or Ro's Cherry Drop Cookies
There were a lot of girls named Julie in my school when I was a kid. Julie, Laura, Jill, Lisa, Debbie, Amy, Susan, Beth.....the list goes on and on. For every Julie, Beth, and Laura then---there's an Olivia, Emma, and Hannah now. I have two friends named Julie and for some reason my aunt can never remember which one is which. Apparently last names are too much for her. So she calls them blonde Julie and dark-haired Julie, as in, "I ran into blonde Julie at the grocery store today and we talked for 15 minutes about our snow plow service problems." Or, "I saw dark-haired Julie at the mall today. We were both buying underwear for our husbands." All stuff I need to know. Anyway, dark-haired Julie's mom Ro makes these fabulous Cherry Drop Cookies which have the most scrumptious chocolate frosting. I used to make the cookies without the frosting because I don't like chocolate and fruit together, but yesterday I baked some cookies for a teachers' lunch at school and frosted them. And tasted them. Just one or two broken ones. And....I'm a convert. These cookies MUST always be made WITH the frosting! They are easy and delicious. If you take the butter out the night before it will take you about five minutes to mix up the dough. Make sure to make the frosting AFTER the cookies cool--if you make it too soon it may be difficult to dip the cookies into the frosting. Thanks, dark-haired Julie. Thanks, Ro!
DARK-HAIRED JULIE'S MOTHER'S COOKIES OR RO'S CHERRY DROP COOKIES
1 C butter, softened
3/4 C powdered sugar
1 t vanilla
1 t almond extract
1/2 t salt (I use kosher salt)
2 1/4 C flour, sifted (I must confess that I don't!)
1/2 C chopped maraschino cherries, drained well
1/4 C walnuts, finely chopped, optional (I omit)
Preheat oven to 350º. Gradually add the powdered sugar to the butter and cream. Add vanilla, almond extract, and salt.
Blend in flour. When flour is incorporated completely, add cherries and nuts (if using).
Roll dough into small balls (I use a very small scooper to scoop and then roll by hand) and place on parchment paper or Silpat on a baking sheet. Bake for 15 to 18 minutes. When done, bottom will be golden but cookie top will still be light. Let cool on baking sheet and then move to cooling rack. Cool completely before dipping top of cookie into chocolate frosting.
CHOCOLATE FROSTING
1/4 C butter (1/2 stick)
3 T unsweetened cocoa powder
3-4 T buttermilk
2 1/4 C powdered sugar
1/2 t vanilla
In microwave-safe bowl, combine butter, cocoa powder and 3 T buttermilk. Bring to boil in microwave. (I am very impatient and usually just microwave til the butter is melted--and it turns out just fine) Add powdered sugar and vanilla and beat with electric mixer until smooth. Frosting should be thick but not too thick--you may have to add a little extra buttermilk while you are using the mixer--I usually do. You want to be able to dip the cookies into the frosting and not have the frosting run off the cookie.
Thursday, April 9, 2009
Barefoot Bloggers: Chinese Chicken Salad
Today's recipe from "Barefoot Bloggers" is Ina Garten's Chinese Chicken Salad. This recipe was chosen by McKenzie of Kenzie's Kitchen. and is from Ina's Barefoot Contessa Parties! cookbook. I just got back from a weekend away AND am trying to get ready for Passover, so I decided to make my life a bit easier and use a rotisserie chicken from Costco. I have roasted chicken breasts per Ina's instructions before and they turned out great, but the store-bought chicken worked out fine in this recipe. I also omitted any extra salt, as the soy sauce contains plenty of salt, and many commenters said that the recipe as written was too salty. I felt that the 1/4 C of peanut butter was a bit too much and added a bit more vinegar and soy to compensate. Next time I would start with 1/8 C of peanut butter and taste before adding more. I also added a package of Chinese noodles and some snow peas, making this a Chinese Chicken Noodle Salad. The salad was delicious and I would definitely make it again. Ina, although a bit of a salt freak, certainly knows her stuff!
CHINESE CHICKEN SALAD
from Barefoot Contessa Parties!
INGREDIENTS
4 split chicken breasts (bone-in, skin-on)
Good olive oil
Kosher salt
Freshly ground black pepper
1/2 pound asparagus, ends removed, and cut in thirds diagonally
1 red bell pepper, cored and seeded
2 scallions (white and green parts), sliced diagonally
1 T white sesame seeds, toasted
FOR THE DRESSING
1/2 C vegetable oil (I would probably use a bit less next time)
1/4 C good apple cider vinegar
3 T soy sauce
1 1/2 T dark sesame oil
1/2 T honey
1 clove garlic, minced (I grated it using a Microplane)
1/2 T peeled, grated fresh ginger (I also used a Microplane to grate this-and I probably used more than 1/2 t)
1/2 T sesame seeds, toasted
1/4 C smooth peanut butter (I would start with less and taste before adding more)
2 t kosher salt (I omitted)
1/2 t freshly ground black pepper
DIRECTIONS
Preheat the oven to 350º. Place the chicken breasts on a sheet pan and rub the skin with olive oil. Sprinkle liberally with salt and pepper. Roast for 35 to 40 minutes, until the chicken is just cooked. Set aside until cool enough to handle. Remove the meat from the bones, discard the skin, and shred the chicken in large bite-sized pieces. (Or just go buy a rotisserie chicken and shred.)
Blanch the asparagus in a pot of boiling salted water for 3 to 5 minutes until crisp-tender. Plunge into ice water to stop the cooking. Drain. Cut the peppers into strips about the size of the asparagus pieces. Combine the cut chicken, asparagus, and peppers in a large bowl.
Whisk together all of the ingredients for the dressing and pour over the chicken and vegetables. Add the scallions and sesame seeds and season to taste. Serve cold or at room temperature.
Wednesday, April 8, 2009
Passover: Fantastically Fabulous Matzoh Toffee
You don't have to be Jewish to love this delicious Passover confection! Simple to make and addicting to eat, it is sure to be a treat that you will make year after year. I make some with nuts and some without to make everyone happy!
MATZOH TOFFEE
4-6 unsalted matzohs
1 C (2 sticks) unsalted butter
1 C firmly packed brown sugar
3/4 C coarsely chopped chocolate chips (I use semi-sweet and I don't chop them)
chopped nuts, optional
Preheat the oven to 350º. Line one or two baking sheets completely with foil and then with parchment paper. Place the matzohs on the baking sheet, covering completely. You may have to break some of the matzohs into pieces to fit onto the sheet.
In a saucepan, combine the butter and brown sugar and stir constantly over medium heat until the mixture comes to a boil--about 2-3 minutes. Boil for 3 minutes, stirring constantly. Remove from the heat and pour over the matzoh, covering completely. Spread to cover if needed.
Place the baking sheet in the oven and bake for 10-15 minutes, checking every couple of minutes to make sure nothing is burning. If mixture or matzoh seem to be burning or browning too fast, remove the pan and lower heat to 325º before replacing pan.
Remove from oven and sprinkle immediately with the (chopped) chocolate chips. Let stand for several minutes, then spread the soft chocolate over the matzoh. If chocolate is not spreadable at this point, turn off the oven and place pan back in oven for a minute or so until chocolate is spreadable. After spreading chocolate, sprinkle on nuts if you are using them. Break into pieces while still warm. Chill in pan or on plate, in freezer until set.
Thursday, March 26, 2009
Barefoot Bloggers: Tomato and Goat Cheese Tarts
Today's recipe from "Barefoot Bloggers" is Ina Garten's Tomato and Goat Cheese Tarts. This recipe was chosen by Anne of Anne Strawberry. and is from Ina's Barefoot Contessa at Home cookbook. It looks elegant and is easy and delicious! This would be a great appetizer or first course. Using frozen puff pastry made it really easy--Ina herself even admits that "pastry still makes me anxious" and that when she "discovered frozen puff pastry, it was such a relief." If it's good enough for Ina, it's probably good enough for you and me! Ina also suggests this tart for an elegant lunch.
TOMATO AND GOAT CHEESE TARTS
from Barefoot Contessa at Home
This recipe makes 4 individual tarts
INGREDIENTS
1 package (17.3 ounces/2 sheets) puff pastry, defrosted (just defrost overnight in the refrigerator)
Good olive oil
4 C thinly sliced yellow onions (2 large onions)
3 large garlic cloves, cut into thin slivers
Kosher salt and freshly ground black pepper
3 T dry white wine
2 t minced fresh thyme leaves
4 T freshly grated Parmesan, plus 2 ounces shaved with a vegetable peeler
4 ounces garlic-and-herb goat cheese (Ina recommends Montrachet)
1 large tomato, cut into 4 (1/4-inch-thick) slices
3 T julienned basil leaves
DIRECTIONS
Unfold a sheet of puff pastry on a lightly floured surface and roll it lightly to an 11 by 11-inch square. Using a 6-inch wide saucer or other round object as a guide, cut 2 circles from the sheet of puff pastry, discarding the scraps. Repeat with the second pastry sheet to make 4 circles in all. Place the pastry circles on 2 sheet pans lined with parchment paper and refrigerate until ready to use.
Preheat the oven to 425ºF.
Heat 3 T of olive oil in a large skillet over medium to low heat and add the onions and garlic. Saute for 15 to 20 minutes, stirring frequently, until the onions are limp and there is almost no moisture remaining in the skillet. Add 1/2 t salt, 1/4 t pepper, the wine, and thyme and continue to cook for another 10 minutes, until the onions are lightly browned. Remove from the heat.
Using a sharp paring knife, score a 1/4-inch-wide border around each pastry circle. Prick the pastry inside the score lines with the tines of a fork and sprinkle a tablespoon of grated Parmesan on each round, staying inside the scored border.
Place 1/4 of the onion mixture on each circle, again staying within the scored edge. Crumble 1 ounce of goat cheese on top of the onions. Place a slice of tomato in the center of each tart. Brush the tomato lightly with olive oil and sprinkle with basil, salt, and pepper. Finally, scatter 4 or 5 shards of Parmesan on each tart.
Bake for 20 to 25 minutes, until the pastry is golden brown. The bottom sheet pan may need an extra few minutes in the oven. Serve hot or warm.
Labels:
appetizer,
Barefoot Blogging,
elegant,
first course,
ladies' luncheon,
lunch,
parties
Sunday, March 15, 2009
Barefoot Bloggers: Chicken Piccata
The latest recipe from "Barefoot Bloggers" features Ina Garten's Chicken Piccata. I am weeks late on the last recipe, Meringues Chantilly, but it is coming soon. The current recipe was chosen by Lindsey of Noodle Nights and Muffin Mornings. This recipe is from Ina's Barefoot Contessa at Home cookbook and it is a keeper! I actually have made this before, following Ina's instructions to the letter. I liked it but found the sauce not "saucey" enough--in other words, there wasn't enough sauce, and a bit too lemony, if that is possible. This time around I added about a 1/2 cup or so of chicken broth at the same time as the wine. I also added some capers at the end or, in the words of Boy #2, "What ARE these things???" I will definitely make this again--it is easy and delicious!
CHICKEN PICCATA
from Barefoot Contessa at Home
(This recipe makes 2 servings. Adjust quantities accordingly for more.)
INGREDIENTS
2 split (1 whole) boneless, skinless chicken breasts
Kosher salt and freshly ground black pepper
1/2 C all-purpose flour
1 extra-large egg (NOTE: Ina always uses extra-large eggs--she feels they are the best value for the money)
1/2 T water
3/4 C seasoned dry bread crumbs
Good olive oil
3 T unsalted butter, room temperature, divided
1/3 C freshly squeezed lemon juice (2 lemons), lemon halves (scrubbed clean) reserved
1/2 C dry white wine
1/2 C chicken broth, optional (NOTE: I added this to the recipe)
sliced lemon, for serving
Chopped fresh parsley leaves, for serving (NOTE: I forgot to get parsley at the store, so mine were parsleyless)
1 T or so capers, optional
DIRECTIONS
Preheat the oven to 400˚F. Line a sheet pan with parchment paper.
Place each chicken breast between 2 sheets of parchment paper or plastic wrap and pound out to 1/4-inch thick. (NOTE: You can also ask your butcher to do this for you at the store). Sprinkle both sides with salt and pepper.
Mix the flour, 1/2 t salt, and 1/4 t of pepper in a shallow plate. In a second plate, beat the egg and 1/2 T of water together. Place the bread crumbs on a third plate. Dip each chicken breast first in the flour, shake off the excess, and then dip in the egg and bread crumb mixtures. NOTE: This works best if you use one hand only to dip the chicken in all three mixtures.
Heat 1 T olive oil in a large sauté pan over medium to medium-low heat. Add the chicken breasts and cook for 2 minutes on each side, until browned. Place them on the sheet pan and allow them to bake for 5 to 10 minutes while you make the sauce.
For the sauce, wipe out the sauté pan with a dry paper towel. Over medium heat, melt 1 T of the butter and then add the lemon juice, wine, the chicken broth if you are using it, the reserved lemon halves, 1/2 t salt, and 1/4 t pepper, and capers if you like. Boil over high heat until reduced in half, about 2 minutes. Off the heat, add the remaining 2 T of butter and swirl to combine. Discard the lemon halves and serve 1 chicken breast on each plate. Spoon on the sauce and serve with a slice of lemon and a sprinkling of fresh parsley.
Labels:
Barefoot Blogging,
chicken,
crowd pleasers,
dinner,
family recipes
Thursday, February 12, 2009
Barefoot Bloggers: Real Meatballs and Spaghetti
Today's edition of"Barefoot Bloggers" is Ina Garten's Real Meatballs and Spaghetti. This recipe was chosen by Rebecca of Ezra Pound Cake. I guess I have been making fake meatballs all this time but now I have the secret-- straight from the master. Actually, Ina tells us (in her Barefoot Contessa Family Style cookbook) that spaghetti and meatballs was not something her mother made while she was growing up, so she had to do some research about the dish. She tells us that "the best idea came from the famous New York Italian restaurant called Rao's"--where they add water to the meatballs, which keeps them "moist and delicious." I really liked the meatballs--they WERE moist, light, and delicious--but found them a bit salty. I find in general, that Ina has a bit of a heavy hand with the salt. I cut the salt down to about 1 1/3 t kosher salt--yet I still found the meatballs a bit too salty. That also may have been due to the seasoned bread crumbs. I might use only 1 t of salt the next time I make them. Also I think next time I would bake the meatballs rather than fry them in order to cut down on the fat. Ina's sauce was good but not great. It was missing that certain something that makes you want to take a piece of bread and sop up all the extra sauce on your plate. Maybe some fresh basil would be a nice addition. I would definitely make this dish again with a few tweaks. Bon Appetit!!!
FINAL VERDICT:
Meatballs--Great!
Sauce--Needs something.....not sure what.
REAL MEATBALLS AND SPAGHETTI
from Barefoot Contessa Family Style
For the Meatballs:
1/2 pound ground veal
1/2 pound ground pork
1 pound ground beef
1 C fresh white bread crumbs (4 slices, crusts removed) (NOTE: I used 1 C only of seasoned dry bread crumbs and
omitted the fresh ones)
1/4 C seasoned dry bread crumbs
2 T chopped fresh flat-leaf parsley
1/2 C freshly grated Parmesan cheese
2 t kosher salt (NOTE: I used 1 1/3 t and I thought THAT was too much)
1/2 t freshly ground black pepper
1/4 t ground nutmeg
1 extra-large egg, beaten
3/4 C warm water
Vegetable oil
Olive oil
For the Sauce:
1 T good olive oil
1 C chopped yellow onion (1 onion)
1 1/2 t minced garlic
1/2 C good red wine, such as Chianti
1 28-oz can crushed tomatoes, or plum tomatoes in puree, chopped
1 T chopped fresh flat-leaf parsley
1 1/2 T kosher salt (may want to cut down a little)
1/2 t freshly ground black pepper
For Serving:
1 1/2 pounds spaghetti, cooked according to package direction
Freshly grated Parmesan cheese
Place the ground meats, both bread crumbs, parsley, Parmesan, salt, pepper, nutmeg, egg, and 3/4 C warm water in a bowl. Combine very lightly with a fork. Using your hands, lightly form the mixture into 2-inch meatballs. You will have 14 to 16 meatballs. (NOTE: I used a small ice-cream-type scoop to measure out the meat and then formed them into balls with my hands. I ended up with about 30 meatballs.)
Pour equal amounts of vegetable oil and olive oil into a large (12-inch) skillet to a depth of 1/4 inch. Heat the oil. Very carefully, in batches, place the meatballs in the oil and brown them well on all sides over medium-low heat, turning carefully with a spatula or a fork. This should take about 10 minutes for each batch. Don't crowd the meatballs. Remove the meatballs to a plate covered with paper towels. Discard the oil but don't clean the pan.
For the sauce, heat the olive oil in the same pan. Add the onion and sauté over medium heat until translucent, 5 to 10 minutes. Add the garlic and cook for 1 more minute. Add the wine and cook on high heat, scraping up all the brown bits in the pan, until almost all the liquid evaporates, about 3 minutes. Stir in the tomatoes, parsley, salt, and pepper.
Return the meatballs to the sauce, cover, and simmer on the lowest heat for 25 to 30 minutes, until the meatballs are cooked through. Serve hot on cooked spaghetti and pass the grated Parmesan cheese.
Some helpful hints from Ina:
When you cook spaghetti, don't use oil in the water; the sauce will stick better.
When the spaghetti is cooked, drain it in a colander. If you don't use it right away, run hot water over it and it will separate.
I (Ina) use Pepperidge Farm sandwich white bread for fresh bread crumbs.
Monday, January 26, 2009
Marianne's Mac 'n' Cheez for Boy #2
Boy #2 has been bugging me for weeks to make the mac & cheese recipe he found in a Nickelodeon kids' (obviously) cookbook we have. I finally got around to it and it was pretty good. I still think I like Ina Garten's recipe better--but this was good. It was easy and surprisingly quick to prepare. Buying pre-shredded cheese made it even easier.
MARIANNE'S MAC 'N' CHEEZ
from Stir Squirt Sizzle, a Nick cookbook
6 T unsalted butter
1/2 C plus 2 T all-purpose flour
4 C milk ( NOTE: I used skim--not that it will help!)
1 1/2 t dry mustard
1/4 t cayenne, or to taste
Salt and pepper to taste
1 pound elbow macaroni
3 C coarsely grated extra-sharp Cheddar cheese (about 12 ounces)
1 1/3 C freshly grated Parmesan cheese (about 4 ounces)
1 C fresh bread crumbs (NOTE: I omitted these)
1. Preheat the oven to 350°F and butter a long, shallow baking dish (like a 13-by-9-inch pan).
2. With an adult's help, melt the butter in a big saucepan over low heat. Add the flour slowly while whisking until it's completely combined.
3. Turn up the heat just a bit and add the milk, slowly pouring it in as you whisk. Once it starts to boil, reduce the heat and add the mustard, cayenne, salt, and pepper.
4. Let the mixture simmer, whisking it occasionally, until it begins to thicken. This should take about 2 minutes.
5, Meanwhile, cook the macaroni by following the instructions on the box, undercooking it the teeniest bit.
6. Combine the macaroni, the sauce, the Cheddar cheese, and 1 C of the Parmesan in a big bowl. Mix it all up and pour it into the baking dish.
7. In a smaller bowl, mix the remaining 1/3 C Parmesan with the bread crumbs and sprinkle it on top of the macaroni and cheese. (NOTE: I just sprinkled the remaining Parmesan cheese over the top)
8. Have an adult place the baking dish in the oven and bake for 25 to 30 minutes, or until it is so golden and bubbly that you can't bear to wait another minute.
Serves 4 to 6.
Saturday, January 24, 2009
Mrs. Smith's Lemon Squares
When I was in 5th or 6th grade I took piano lessons from Mrs. Smith, who lived around the corner from us. Every so often she had a recital featuring all her students. I don't know which was more exciting--playing in the recital or eating one of her fantastic lemon squares, which she made for each recital. I don't know if Mrs. Smith is around anymore, but I will always think of her whenever I make these delicious, citrusy, sweets.
MRS. SMITH'S LEMON SQUARES
Crust
3/4 C (1 1/2 sticks) unsalted butter, room temperature
1/2 C powdered sugar
1 1/2 C flour
Topping
3 eggs, beaten
1 1/2 C sugar
3 T flour
juice and rind of 1 1/2 lemons (NOTE: 2 if they're small--a microplane is great for zesting the lemons)
Preheat oven to 325°F. Cream butter and powdered sugar together, then mix in flour til blended. Spread on bottom of square pan and bake for about 15 minutes. Crust should be soft and pale--not raw-looking but just slightly set. Meanwhile, mix together the topping ingredients. When crust comes out of the oven, pour topping over crust and return to oven. Cook for an additional 20 minutes or until topping is set (not wiggling). Cool, cut into squares, and sprinkle with powdered sugar.
Thursday, January 22, 2009
Barefoot Bloggers: Easy Sticky Buns--or "You Might Want to Have Your Sweat Pants Handy"
Ina, Ina, Ina. You'll stop at nothing to fatten us all up, won't you? You don't care about our New Year's resolutions or our tight jeans, is that it? It's all about the butter, isn't it, Ina? This installment of "Barefoot Bloggers" features Easy Sticky Buns. This recipe was chosen by Melissa of Made by Melissa.
This recipe WAS easy and very good. You DO need to discard the ends of the roll as instructed by Ina--just listen to her--she knows what she's doing. Also--make sure you check on the rolls toward the end of cooking--burned raisins and blackened puff pastry are NOT a good combo. I mean, that's what I hear.
INA GARTEN'S EASY STICKY BUNS
from Back to Basics
12 T (1 1/2 sticks) unsalted butter, at room temperature
1/3 C light brown sugar, lightly packed
1/2 C pecans, chopped in very large pieces
1 package (17.3 oz/2 sheets) frozen puff pastry, defrosted
For the filling:
2 T unsalted butter, melted and cooled--NOTE-you may need a bit more
2/3 C light brown sugar, lightly packed
3 t ground cinnamon
1 C raisins
Preheat the oven to 400°F. Place a 12-cup standard muffin tin on a sheet pan lined with parchment paper.
In the bowl of an electric mixer fitted with the paddle attachment, combine the 12 tablespoons butter and 1/3 cup brown sugar. Place 1 rounded tablespoon of the mixture in each of the 12 muffin cups. Distribute the pecans evenly among the 12 muffin cups on top of the butter and sugar mixture.
Lightly flour a wooden board or stone surface. Unfold one sheet of puff pastry with the folds going left to right. Brush the whole sheet with half of the melted butter. Leaving a 1-inch border on the puff pastry, sprinkle each sheet with 1/3 cup of the brown sugar, 1 1/2 teaspoons of the cinnamon and 1/2 cup of the raisins. Starting with the end nearest you, roll the pastry up snugly like a jelly roll around the filling, finishing the roll with the seam side down. Trim the ends of the roll about 1/2 inch and discard. Slice the roll in 6 equal pieces, each about 1 1/2 inches wide. Place each piece, spiral side up, in 6 of the muffin cups. Repeat with the second sheet of puff pastry to make 12 sticky buns.
Bake for 30 minutes, until the sticky buns are golden to dark brown on top and firm to the touch. NOTE: It's a good idea to check on them at about 20 and 25 minutes--you don't want to burn these babies!. Allow to cool for 5 minutes only, invert the buns onto the parchment paper (ease the filling and pecans out onto the buns with a spoon), and cool completely.
Simple and easy, right? Unbutton your jeans, eat, and enjoy! Great for a brunch too!
Wednesday, January 21, 2009
Roasted Cauliflower or "I Can't Believe I Ate an Entire Head of Cauliflower All By Myself!"
For all you people who are still steaming or boiling vegetables--read this. Friend don't let friends steam or boil. I don't know what it is about roasting that transforms vegetables into something amazing--but it does. The ingredients are simple and the process is easy--I roast practically any vegetable--asparagus, green beans, brussels sprouts, onions, potatoes, eggplant, zucchini, carrots, beets, and more. I have a hard time picking my favorite--it changes from time to time--but right now it is cauliflower. Boy #2 eats roasted cauliflower like it is candy. OK, maybe not like candy...but he just loves it! Now I usually roast two heads at a time and we RARELY have any left over.
One of the keys to roasting is a hot oven--I usually roast at about 400°F to 425°F. Preheat your oven for at least 15 minutes before you put the baking sheet in. You can also preheat the oven WITH the baking sheet IN the oven and then pour the vegetables on the baking sheet--you will hear a nice sizzle that way. For the cauliflower, I cut the head up into small pieces because I want as much of the surface to brown as possible. Put the pieces in a large bowl or ziplock bag and add olive oil, kosher salt, and pepper and toss. Don't go crazy on the oil but don't be stingy either--about 1/8 of a cup per head should be fine--I don't really measure--you can always add more if you think you haven't used enough. Kosher salt is less salty than regular salt--so don't be worried that it's going to be too salty--probably about 1/2 to 3/4 of a teaspoon per head is good. Again--I don't measure--I just sprinkle. Fresh pepper to taste. That's it. Spread out on a baking sheet--I line mine with parchment paper for easier clean-up. You want the cauliflower to roast, not steam, so don't overcrowd the baking sheet. Cook about 20 to 30 minutes, tossing occasionally. Basically--with any roasted vegetables--you cook them til they are done the way you like them--I like my cauliflower brown and a bit crunchy so I probably cook them for at least 30 minutes--sometimes more. It's a matter of personal taste. Try it tonight--let me know how it turns out.
Monday, January 19, 2009
Grandma's Toffee Bars
Every time I used to go to my grandma's house there was something yummy there. Both my grandmothers were great cooks AND bakers and one of my mom's mom's specialties was Toffee Bars. There were usually some in the freezer and, while I preferred to wait til mine thawed, my brothers liked to eat them straight from the freezer. My grandfather always claimed ownership of the little bits that crumbled off during cutting!
GRANDMA'S TOFFEE BARS
1/2 lb (2 sticks) unsalted butter, room temperature
1 C light brown sugar
1 t vanilla
1 egg yolk
2 C flour
1 small bag semisweet chocolate chips
chopped nuts (Grandma always used walnuts)
Preheat oven to 350°F. Cream the softened butter and sugar together. Add the vanilla and the egg yolk. Then mix in the flour til completely blended. Spread on bottom of square baking pan and bake at 350°F for 20-25 minutes--check after 20 minutes--cookie bottom should be set but pale. Then turn oven off and sprinkle chocolate chips over the top and return pan to oven for 3-4 minutes or til chocolate is melted and spreadable. Spread over top to cover and sprinkle with the chopped nuts. Wait til cooled slightly before cutting into squares.
Labels:
bar cookies,
chocolate,
dessert,
family recipes,
Grandma,
memories,
sweets
Friday, January 9, 2009
Beth's Glazy Crazy Cocktail Franks
OK, OK, not the best photo, I know, but what can I say? I need to plan ahead better. Many years ago, when I was young and single, my roommate Beth and I used to have parties all the time. She made these cocktail franks that had people practically licking the toothpicks they used to spear the little devils. These are sure-fire winners, easy and delicious. Dump all the ingredients in a pot and cook the crap out of them. I'm serious--cook (uncovered) for about 2 to 3 hours--you want the little dogs to get all shriveled and glazy.
BETH'S GLAZY CRAZY COCKTAIL FRANKS
several packs (3,4,5??) cocktail franks or cocktail smokies
1 box light brown sugar
1 bottle seafood cocktail sauce
1 bottle beer
Add all ingredients to pot and cook, uncovered, for several hours. That's it!
Thursday, January 8, 2009
Barefoot Bloggers: Banana Sour Cream Pancakes
Yes, it's time for another episode of "Barefoot Bloggers" featuring Banana Sour Cream Pancakes. This recipe was chosen by Karen of Something Sweet by Karen. I make pancakes from scratch all the time for my kids, so at first this recipe didn't seem that exciting to me, but the pancakes were actually quite good and my kids really liked them. I think the lemon zest and the vanilla extract really added something great to the batter. The recipe I usually use is from one of the older Joy of Cooking cookbooks and is pretty similar but does not include sour cream, lemon zest, and vanilla. I made a few minor changes to Ina's recipe (my changes are included as notes below)--I added more milk because we don't like our pancakes quite as thick as she apparently does--and the pancakes were STILL pretty thick even with the additional milk I added.. I also added 3 T melted butter to the batter, thereby eliminating the need for butter on the pan or griddle. I used a non-stick pan for cooking. You can make this batter the night before if you like, but you may need to add additional milk to the batter in the morning before cooking. Another easy way to save time is to measure out the dry ingredients into a bowl or ziplock and then add the liquid ingredients in the morning. When my kids were younger and I made pancakes A LOT, I used to measure out several ziplocks of dry ingredients at a time in an effort to make my life just a bit easier! You can also substitute another fruit for the bananas (berries, peaches, etc) or serve them without any fruit at all. I made these for dinner the other night because, in our house, whenever I can't think of anything for dinner, I make breakfast! We all agreed that we would definitely make these pancakes again!
INA GARTEN'S BANANA SOUR CREAM PANCAKES
1 1/2 cups flour
3 tablespoons sugar
2 teaspoons baking powder
1 1/2 teaspoons kosher salt (NOTE: I used about 3/4 t kosher salt)
1/2 cup sour cream (NOTE: I used light sour cream)
3/4 cup plus 1 tablespoon milk (NOTE: I used about 1 1/4 to 1 1/2 C skim milk)
2 extra-large eggs
1 teaspoon pure vanilla extract
1 teaspoon grated lemon zest (NOTE: Anywhere from 1/2 to 1 t should be fine and if you don't have a lemon-just make it without the zest and it will be fine)
Unsalted butter (NOTE: I added 3 T melted butter to the batter)
2 ripe bananas, diced, plus extra for serving
Pure maple syrup
Sift together the flour, sugar, baking powder, and salt. In a separate bowl, whisk together the sour cream, milk, eggs, vanilla, and lemon zest. Add the wet ingredients to the dry ones, mixing only until combined.
Melt 1 tablespoon of butter in a large skillet over medium-low heat until it bubbles.(NOTE: If you've added melted butter to the batter and you are using a non-stick skillet you can skip the previous step.) Ladle the pancake batter into the pan to make 3 or 4 pancakes. Distribute a rounded tablespoon of bananas on each pancake. Cook for 2 to 3 minutes, until bubbles appear on top and the underside is nicely browned. Flip the pancakes and then cook for another minute until browned. Wipe out the pan with a paper towel, add more butter to the pan, (NOTE: Again, if you've added butter to the batter, no need to wipe out the pan--just keep cooking!) and continue cooking pancakes until all the batter is used. Serve with sliced bananas, butter and maple syrup.
Labels:
Barefoot Blogging,
breakfast,
brunch,
kids,
pancakes
Subscribe to:
Posts (Atom)